
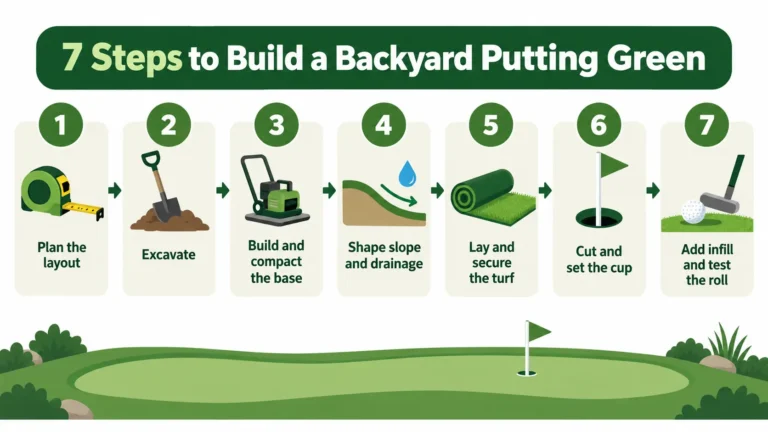
You can build a backyard putting green with artificial turf in a few weekends. Here is how to build a backyard putting green: plan the layout, dig out the area, pack a firm base, shape the slope, lay the turf, set the cups, then add infill and test the roll. The base matters most, because a smooth, solid base gives you true ball roll.
This guide follows that order for a DIY putting green. It shows what to do at each step, which choices matter, and when to call a pro for the putting surface.
Plan the Putting Green Before You Start
If you want to know how to create a putting green in your backyard, start with the space, not the turf. A clear plan saves you from digging twice.
Choose the Location and Size
Measure the available backyard space first. Pick a spot with good light, away from trees that drop leaves and send roots under the base.
Decide your putting distances. A green that allows putts of 10 to 15 feet is enough for steady practice. Leave walking and access areas so you can reach the green and haul in materials.
Check drainage and existing slopes before you commit. Water should flow away from the green, not toward it. Hillside yards are common in San Diego County. A gentle natural slope can help, but a steep one makes the base work harder.
Think about where the ball should finish. Leave a small flat edge around the green so missed putts stop on the turf and do not roll into a flower bed.
Decide on the Shape, Holes and Contours
Mark the layout with a garden hose or marking paint. Oval and kidney shapes work well because they give you several putting angles.
Plan two or three putting cup locations, each with a flagstick as a clear target. Keep part of the green flat so you can learn pace. Add one gently sloped area for simple breaks.
Skip complex contours on a small green. Big breaks in a tight space make putts feel random, and they are hard to build well. Good contours shape the slope and the ball rolls on purpose.
Prepare and Excavate the Area
Installing putting green in backyard soil is mostly digging and packing. Plan your time around those two jobs.
Call 811 before you dig so you do not hit a buried line. The free service at Call 811 marks utilities for you.
Mark the perimeter with paint. Remove all grass, weeds and roots, since vegetation left in the soil rots and sinks over time. Excavate enough soil to fit the base layers plus the turf. The base needs more depth than the turf, so dig deeper than you think.
Set the rough grade as you dig. Pitch the bottom of the excavation slightly away from the house. For general ground steps, read our guide on how to prepare the ground for artificial grass.
Address drainage now. If a spot stays wet or the soil holds water, fix it before you cover the area. You cannot see problems once the base is down.
Build and Compact the Base
A putting green shows every bump. The base is where you win or lose the build.
Add the Base Material
The base is a layer of crushed stone, also called aggregate. It drains water and holds weight. Many installers finish the top with decomposed granite because it packs smooth and fine.
The right depth and mix depend on your soil, your slope and your turf system. Follow the turf maker’s guidance instead of copying a number from another yard. Spread the sub-base in thin layers and rake each one even. For more on layers, see our page on the sub-base for artificial grass.
A good base gives you stability and drainage at once. It is the foundation for the putting surface.
Compact the Base Thoroughly
Rent a plate compactor. Make several passes over each layer, and change direction on each pass.
Walk the base after each round. If it shifts or leaves deep footprints, it needs more passes. Fill any soft or low area, then compact it again. Recheck the whole surface with a long level before you add the next layer.
Create the Final Smooth Surface
Finish with a thin layer of fine material. Pull a straight board across it to remove ridges, then check with a long level and a string line.
The turf is thin and copies the base underneath it. Any dip or hump will show up in the ball roll. Compact this last layer as well. Roll a ball across it and watch for wobbles. Smoothness here saves hours of fixes later.
Shape the Green for Drainage and Ball Roll
The surface must do two jobs. It has to move water away, and it has to give the ball a fair roll.
Build Gentle Contours and Breaks
Build contours into the final layer of the base, not into the turf. Keep one flat practice area. Add a gentle slope for a break.
A mild slope also gives you uphill and downhill putts, which teach speed control. Keep each slope small. Exaggerated breaks look fun, but they make putts unfair. Every contour should be there on purpose. A bump from weak compaction is a flaw, not a feature.
Check Drainage Before You Install the Turf
Run a hose over the base and watch the water. It should soak through the permeable base and run off the edges.
Low points that hold water are standing-water risks. Mark each one and re-grade it now. Existing drainage problems in your yard will not vanish under turf. Fix the grade or add a drainage path before you go on.
Install the Artificial Putting Turf
An artificial grass putting green needs putting turf, not lawn turf. Putting turf has short, dense fibers made for a true roll. Lawn turf is too tall and slows the ball.
Position and Acclimate the Turf
Roll the turf out over the base. Let it relax in the sun for a few hours so the wrinkles settle.
Confirm the orientation. The fibers lean one way, and that lean affects roll. Lay every piece in the same direction. Leave extra turf on all sides for trimming.
Cut the Putting Surface to Shape
Mark the perimeter with chalk. Cut from the backing side with a sharp utility knife for a clean edge. Go slowly and follow the line.
Plan your pieces to avoid unnecessary seams. Fewer seams mean fewer weak spots in the putting surface.
Stretch and Secure the Turf
Pull the turf tight to remove wrinkles. Stretch it gently, since too much pull can warp the green.
Secure the edges first. Landscape nails and landscape staples hold the turf in place. Set them close together along the edges and farther apart across the middle. Add edge restraint, like pavers or a border, so edges do not lift.
Where you must join two pieces, use seam tape and adhesive. Press the turf backing into the glue and brush the fibers over the joint so the seam blends in.
Install the Putting Cups
Set the final putting cup locations only after the contours and surface are done. Some builders test movable cups first, then commit once the green feels right.
A regulation hole is 4.25 inches wide and at least 4 inches deep, per the Rules of Golf. Most backyard cups follow that size.
For each cup location, follow these steps:
- Mark the spot, keeping it away from seams and edges.
- Cut the turf carefully with a knife.
- Dig out the opening in the base so the cup sits snug.
- Set the cup securely so it cannot shift.
- Check that the rim sits flush with the finished surface.
A cup set too high bounces the ball out. A cup set too low makes the ball stall at the edge. Add the flagstick once the hole is set.
Add Infill, Brush the Turf and Test the Roll
This is your last build stage, and it shapes how the green feels.
Apply the Appropriate Infill
Infill supports the fibers, stabilizes the turf and protects the surface. It also changes the feel and putting speed.
The amount depends on your turf and system, and some putting turf needs very little. Follow the maker’s directions instead of using one rule for every green.
Brush the Turf Evenly
Brush the turf to spread the infill and stand the fibers upright. A power brush speeds this up on larger greens. Work in several directions, then check that the surface looks even and consistent.
Test the Green Before Calling It Finished
Do not stop at looks. Roll putts from several directions and check for these problems:
- High spots and low spots that bend the ball off line
- Breaks that change from one putt to the next
- Visible seams
- Soft or moving areas under foot
Correct any flaw now. Surface consistency is what separates a good green from a lumpy one.
Common Mistakes That Ruin a Putting Green
- Lumpy base from weak compaction: Too few passes leave soft spots that sink later.
- Wrong turf: Lawn turf cannot give a true roll.
- Visible seams: Poor glue work and bad cuts create lines the ball follows.
- Poor drainage: Water that sits under the turf ruins the base.
- No edge restraint: Loose edges lift and curl.
DIY Putting Green vs. Professional Installation
Knowing how to build a backyard putting green is one thing. Doing the base work well is another.
A DIY putting green backyard project makes sense for a simple, flat shape when you have the time, the tools and the strength to pack the base right. Professional installation helps when the job has:
- Complex contours
- Difficult drainage
- A larger green
- Several turf sections and seams
- Tight access
- High expectations for ball roll
SD Home Turf is a licensed California contractor (Lic #1062005) with 10+ years of experience in San Diego County. If you want a green building to last, learn about our putting green turf installation and request a free consultation.
FAQs
How deep should I dig for a backyard artificial putting green?
Dig deep enough for your planned base plus the turf. The depth depends on your soil and turf system, so check the maker’s directions.
What should I put under artificial putting green turf?
Use a compacted base of crushed stone or aggregate. A fine top layer, such as decomposed granite, gives a smooth finish.
Does an artificial putting green need drainage?
Yes. Water needs a path through the turf and base, then away from the green. Standing water damages the base.
Can I build a putting green myself?
Yes, for the right project. A putting green backyard diy build is realistic when the shape is simple. The hard parts are base work and surface consistency.
How do I get a smooth ball roll on artificial turf?
Pack the base well, make the top layer smooth, install the turf with no wrinkles, and brush it evenly.
Do I need infill on a putting green?
It depends on your putting turf and system. Some need a light layer, and some need little or none.